


![]() ATTEMPTING TO ADJUST OR REMOVE A TORSION SPRING ASSEMBLY AND/OR ANY RED COLORED FASTENERS WITHOUT PROPER TRAINING OR TOOLS MAY RESULT IN AN UNCONTROLLED RELEASE OF SPRING FORCES WHICH CAN CAUSE SERIOUS OR FATAL INJURY.
ATTEMPTING TO ADJUST OR REMOVE A TORSION SPRING ASSEMBLY AND/OR ANY RED COLORED FASTENERS WITHOUT PROPER TRAINING OR TOOLS MAY RESULT IN AN UNCONTROLLED RELEASE OF SPRING FORCES WHICH CAN CAUSE SERIOUS OR FATAL INJURY.
PROFESSIONAL INSTALLATION IS RECOMMENDED.
DO NOT attempt to perform maintenance on this door unless:
- you have the proper tools and reasonable mechanical aptitude or experience; and
- you follow these instructions very carefully.
STANDARD TORSION SPRING: HOW TO REMOVE TENSION FROM SPRINGS TO REPLACE DOOR HARDWARE
These instructions apply only for the purpose of removing tension from torsion springs mounted to the front header and with drums located inside of the tracks. If springs are not mounted to the front header or if drums are located outside of the tracks, contact a professional installer.
![]() DO NOT USE SCREWDRIVERS OR ANY SUBSTITUTES FOR SOLID STEEL WINDING BARS WHEN WORKING WITH TORSION SPRINGS. USE OF SUBSTITUTES FOR SOLID STEEL WINDING BARS MAY RESULT IN SUDDEN RELEASE OF SPRING FORCES WITH DANGEROUS FORCE AND RISK SEVERE INJURY.
DO NOT USE SCREWDRIVERS OR ANY SUBSTITUTES FOR SOLID STEEL WINDING BARS WHEN WORKING WITH TORSION SPRINGS. USE OF SUBSTITUTES FOR SOLID STEEL WINDING BARS MAY RESULT IN SUDDEN RELEASE OF SPRING FORCES WITH DANGEROUS FORCE AND RISK SEVERE INJURY.
 Disconnect garage door opener. Refer to your door opener manual for instructions on how to disconnect. Lock door securely in down position using the door lock. If there is no door lock, to secure door in down position, apply C-clamp or locking pliers placed in track, directly above a roller.
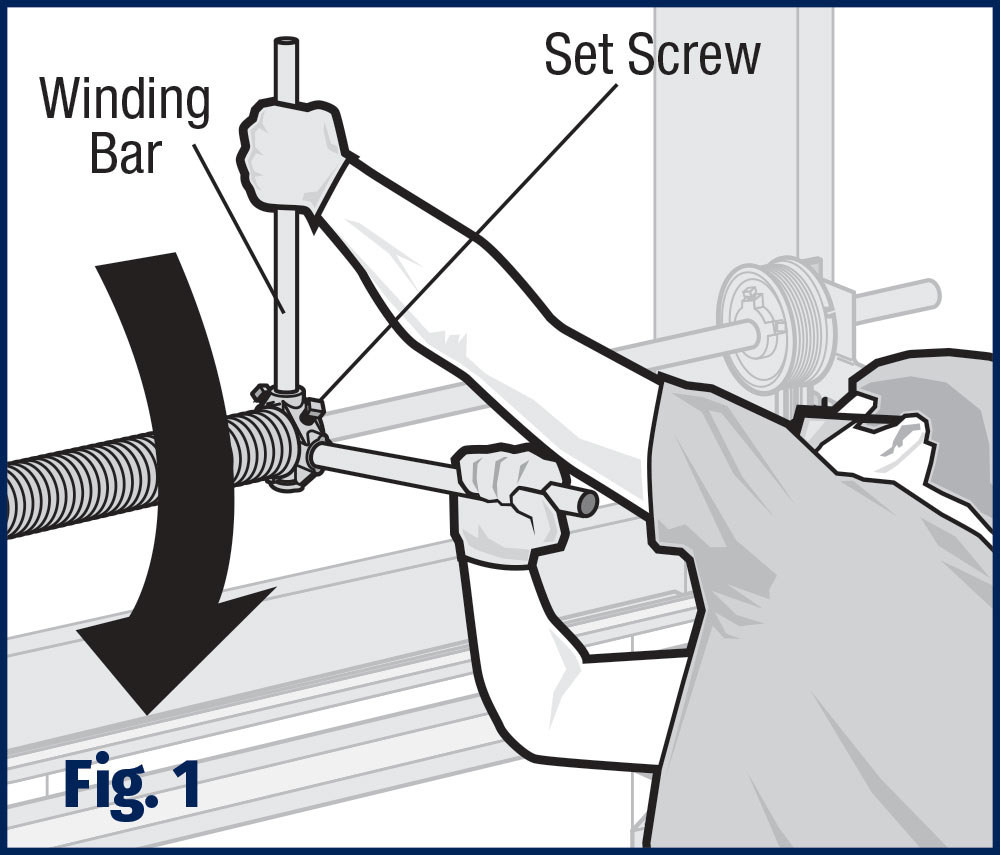
 Using a sturdy ladder, stand beyond the outer edge of the spring near the spring’s winding cone. Fully insert a winding bar into the holes of the winding cone as shown in (Fig. 1). Positioning your hand near end of winding bar, slightly push winding bar up to gauge the amount of force applied by spring. If you feel uncomfortable handling this force, stop and contact a professional installer. If you feel comfortable, proceed to next steps.
 Be ready to record the number of 1/4 turns it takes to remove tension. After other work is complete, you will reapply the spring tension with the same number of 1/4 turns that you initially removed.
Number of 1/4 turns: ________
 Push up on winding bar to allow second winding bar to be inserted into next lower hole of spring winding cone, then slowly lower winding bars to allow second winding bar to rest against the back of door.
 Winding bars must always be inserted full depth of holes in winding cone and supported before any set screws on spring winding cones are loosened. Loosen two set screws on spring winding cone with 3/8″ wrench while firmly holding lower winding bar and making sure that lower winding bar is against back of door. When set screws are loose, full spring tension will be on lower winding bar (Fig. 1).
 Push up slightly on upper winding bar and remove lower winding bar. Allow spring tension to slowly rotate upper winding bar downward so that upper winding bar rests against back of the door. This decreases tension on spring in 1/4 turn increments. Insert the removed winding bar into the next upper hole of spring winding cone, while leaving the now lower winding bar resting on the door.
 Repeat process of pushing up slightly on upper winding bar, removing lower winding bar and letting spring tension slowly rotate upper winding bar down until it rests against back of door. Repeat this process until all tension is removed from torsion spring. Record number of 1/4 turns it took to remove tension above.
 Repeat Steps 2–7 on the opposite side if there are two springs.


