


![]() FAILURE TO FOLLOW THE FOLLOWING INSTRUCTIONS MAY RESULT IN RAPID RELEASE OF SPRING ENERGY CAUSING DAMAGE TO THE UNIT OR SERIOUS INJURY.
FAILURE TO FOLLOW THE FOLLOWING INSTRUCTIONS MAY RESULT IN RAPID RELEASE OF SPRING ENERGY CAUSING DAMAGE TO THE UNIT OR SERIOUS INJURY.
![]() TO AVOID PERSONAL INJURY, DO NOT REST HAND OR ANY BODY PART ON SPRING(S) OR ANY PART OF EZ-SET® TORSION SPRING SYSTEM WHILE ADJUSTING TENSION OF SPRING(S).
TO AVOID PERSONAL INJURY, DO NOT REST HAND OR ANY BODY PART ON SPRING(S) OR ANY PART OF EZ-SET® TORSION SPRING SYSTEM WHILE ADJUSTING TENSION OF SPRING(S).
- Adjust number of spring winds only when door is completely closed.
- Always operate drill at half speed.
- If additional winding is required or system has to be completely unwound, wait AT LEAST 5 MINUTES between consecutive winds/unwinds.
- If for any reason unit begins to resist winding, stop winding at once and wait AT LEAST 5 MINUTES before continuing.
REAPPLY TENSION TO EZ-SET® TORSION SPRING
These instructions apply only for the purpose of applying tension to residential EZ-SET® torsion spring configurations with standard radius (springs mounted to front header of garage).
 Lock door securely in down position using the door lock. If there is no door lock, to secure door in down position, apply C-clamp or locking pliers placed in track, directly above a roller.
![]() DOOR MUST BE LOCKED IN DOWN POSITION ACCORDING TO STEP 1 TO PREVENT DOOR FROM PREMATURELY OPENING WHICH COULD CAUSE INJURY.
DOOR MUST BE LOCKED IN DOWN POSITION ACCORDING TO STEP 1 TO PREVENT DOOR FROM PREMATURELY OPENING WHICH COULD CAUSE INJURY.
 Ensure there is a printed straight line across the unwound spring. If there is not a printed straight line on the springs, make one with a piece of chalk. As the spring is wound, the straight line will spiral creating stripes across the spring. Each stripe represents one full turn on spring.
 Ensure the cable is positioned in the notch of the cable drum. Make sure the cable follows the grooves in the cable drum. Turning cable drum removes cable slack. With cable taut, apply locking pliers to torsion tube to maintain tension on the cable (Fig. 1). Repeat this step on the opposite side. Do not proceed to wind springs if there is slack in the cable.
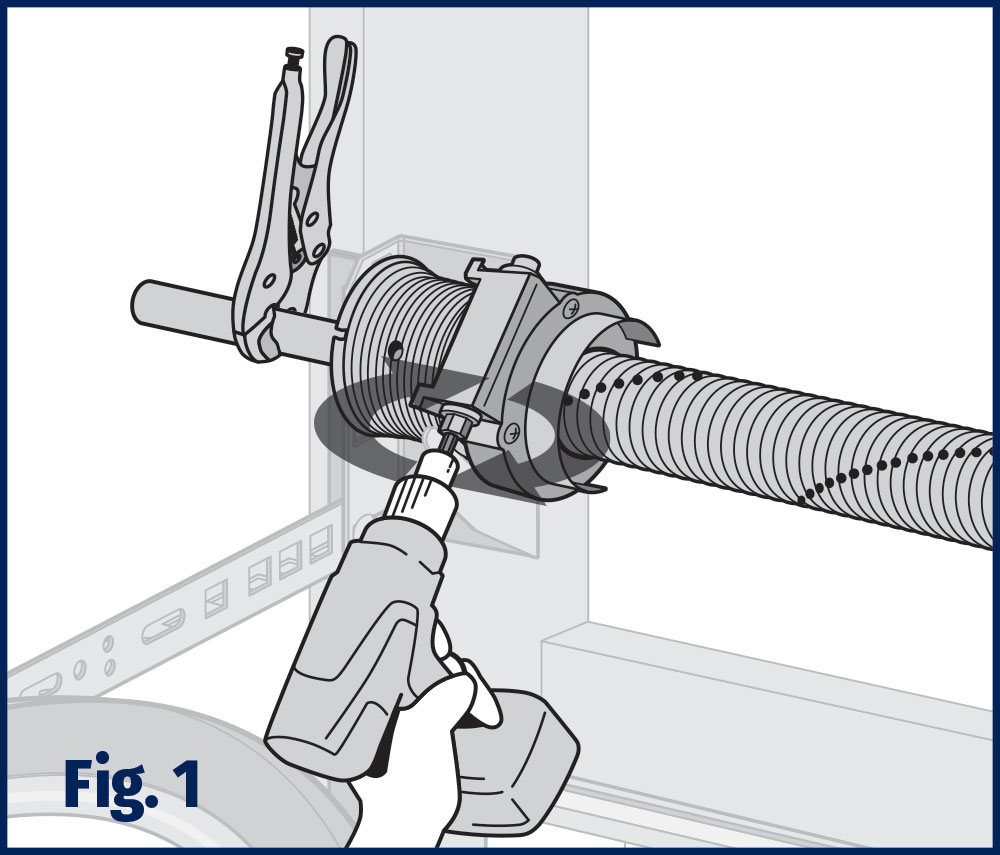
 Engage drill with 1/4″ insert bit (or 7/16″ drive bit) into drive shaft of winding unit to wind spring. Using half speed, wind the spring a total of 11-1/4 winds for a 7′ tall door. If 8′ tall door, wind the spring a total of 12-3/4 winds. Count the number of stripes to determine how many winds you have made on the spring (Fig. 1).
- If spring tension needs reduced, unwind spring by placing drill in reverse (counter-clockwise).
 If 2 springs: Repeat Steps 2–4 on the opposite side.
 Now that tension is applied, remove the locking pliers from the torsion tube and remove the C-clamp or locking pliers from the track, if used.


